Showing posts with label finishing. Show all posts

Wednesday, April 10, 2019

At long last....


Rachel at Ten Hour Stitcher (LINK) is our host for this compltely brilliant SAL.  Thanks again, Rachel, for the much needed kick in the pants! 

This one requires a little history.  In 1995, I was able to attend the Spirit of Cross Stitch Festival in Valley Forge.  It was the second time I’d gone to SOCS and this time I not only knew what my class projects looked like *before* class started, I was prepared for the awesome merchandise mall.  By that I mean I was ready to look for charts and supplies for classes from a previous year that I’d fallen in love with.  One of the charts I picked up was Merry Cox’s Sampler Sewing Case.  After a minor debate with myself, I also bought the SOCS video class with Merry since the project was a similarly designed sewing case.

Understand that the intent behind purchasing the video was to get detailed finishing instruction for the other chart – I had no intention of stitching the case in the video.

Are you laughing yet?

Of course at some point after finishing the first sewing case, I ended up contacting Merry in order to acquire her materials kit for the case in the video.  The original sampler case was stitched in 1997 and fully finished shortly thereafter.


While working on the second sampler case, I decided I wanted it to be different from the first one – my chart has so many notes and ideas in the margins!  The plan was to turn Merry’s normal mattress pincushion into a pocket.  And oh, while I’m at it, let’s make the needlebook a bit snazzier too.

Stitching for this small was finished in (*cough*) 2003.  Ever since, it’s been rolled up and tucked carefully into my (Merry Cox SOCS class) Shaker Box with a number of my completed smalls, patiently waiting for me to go through my making-quilts frenzy and come back to stitching.

 
(This is Merry’s case – screenshots from video class)

A few years ago I got a bug to finish the sewing case.  For some reason, I’d thought it was larger than the first case.  Nope.  As charted, it's not even as big as the first one.  So there was pondering as to how to enlarge it without losing the original feel of the project (and also without broad expanses of blank linen).  I trawled eBay to acquire more of one of the project threads, DMC flower thread (long gone from LNS inventories), then planned and stitched a border.

And then I got cold feet.

Really, what had I been thinking?  A tool-holding pouch with a flap closure in this itty-bitty case?  Back into the Shaker box it went so it could … age a bit more.

Enter Rachel’s SAL (*whoops and cheers and applause*), which got me seriously thinking about this project again.  Preparing to work on the project required some serious advance planning steps, beginning with figuring a way to transfer the video file to my laptop which does not have an integral DVD drive.  Hey, at least it was *on* a DVD rather than a now-useless VHS tape thanks to Wonderful Husband.

For the past few weekends I’ve disappeared into the back bedroom (where sewing machine, ironing board, and other essentials reside) for an hour or so a day.  Yes, in addition to being a slow stitcher, I’m a slow finisher as well.

Now when one is off the instructions map, one needs mock ups and templates to ensure plans and ideas work.  Especially when one’s design is way too fancypants for one’s own good.


That tiny bit of paper with staples is my pocket model and the other paper is my pattern.  I even basted the pieces to the outer case this time!


I changed the poem just a touch since I saw no reason to break words across two lines.


On the inside bits, I stitched the letters over one so there would be room for more information ... and so I could put designs and words on the undersides of those flaps.  I also added a strap to better secure my scissors - when Merry shows off her Sampler Sewing Case #1 in the video, you can see she made a scissor strap for that one, though I don't think it's called for in either pattern.


Rather than nun’s edged linen needlepages, I used felted wool to better protect my needles and pins from rust - our climate is more humid than I'd like.


Here's that pesky double pocket that took so long to go from wisp of idea to reality.


Even though I didn’t want to add all the bows that Merry used on her case, I thought the waxer pouch was a good place for the little bow charm.  The drawstring on the other pouch is made from some of the silk ribbon provided to make those triple bows (see pics of Merry's case) – they were a bit too frou-frou for me.


Happy dancing!  Certainly it took me long enough to finish this piece, but I'm generally pleased with the result.

Thanks for visiting with me today, and for allowing me to ramble.


>^..^<


Friday, March 1, 2019

Lacing a Lady


Since you asked about the lacing for Jane Turner, I wanted to share the resources I found when getting ready to work.  Well, whatever I asked my good friend Google to find when I first looked, I was completely unable to replicate it.  When preparing to lace Lady Jane, I read a number of online answers to “what kind of thread should I use?” and the most repeated answer was perle cotton.
  
THIS LINK *might* be one of the sites I found before – at least the post mentions (perhaps just implies?) using a single strand to do the side-to-side lacing and a second single strand for top-to-bottom.

Anyway, other than securing the corners, YES - Jane is laced to her mounting board (acid-free foam core) with just TWO lengths of perle cotton.  

While I've laced all the cross stitch pieces I've framed, I had not tried this single-strand method before.  Noah is in a 16 by 20 frame (I think), and that's laced using dental floss with a fair number of starts and stops - probably ten to twelve of floss each time.

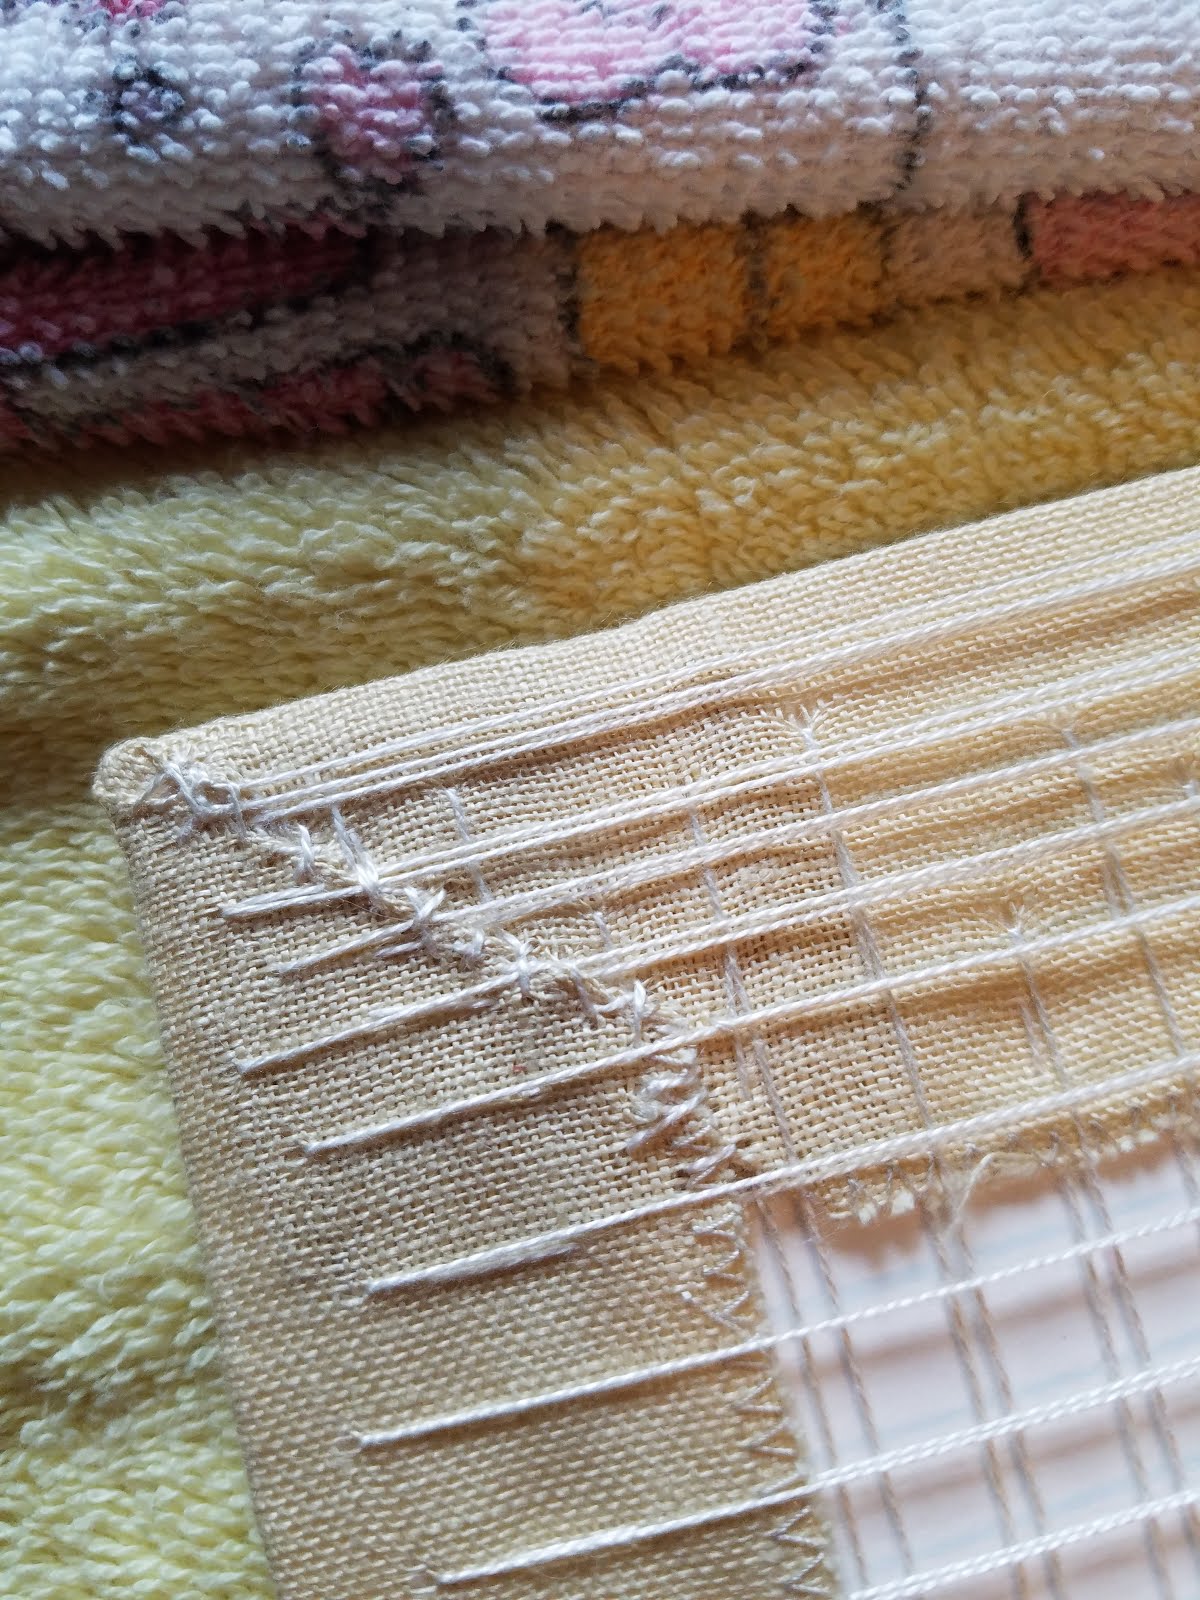
Anyway, back to Jane.  Starting in the center of the longer dimension is what I normally do.  Pull a yard or two of perle cotton from the ball and thread your needle onto the end.  Do not cut the perle cotton and do not anchor it into your fabric.  Go back and forth (er … side to side) several times – three or four stitches – and then very gentle pull more thread through each stitch you’ve taken so that you again have a length of thread to work with.  Take three or four more stitches and again work the thread through all the stitches you’ve made.  After you’ve used up what you’ve pulled loose from the ball of perle cotton, unwind several more lengths.

Yes, this is EXTREMELY tedious!! 

When working on Jane, I would do three or four “pulls” at a time from the ball of perle cotton, and then work that through all stitches taken till I got to the place where the needle was.  To be more specific about what I mean by a pull, I would hold the perle cotton ball down on the work surface with one hand and pull a length out with the other hand until my arm was fully extended.  So for me, a pull is a bit more than one yard.

Oh yeah, since you start in the middle of the side, it’s a really good idea to try to keep count of the “pulls” you take from the ball.  Once you get to the end you’ve been working toward, make sure you have a foot or two extra thread at the end, then remove your needle from the thread.  Now comes the really fun part.

Since you’ve been keeping count of the number of pulls you’ve taken from the ball of perle cotton, you know how much thread to pull off the ball to lace the other half of your piece of needlework.  This will likely convince you that I am completely nuts:  make the same number of pulls from the ball of perle cotton as you used to lace up half of the side of your stitched piece, being very careful about how you lay this down on whatever you’re using for a work surface – you really don’t want this to get tangled up.  Add a few more pulls as a safety margin, then cut the thread and thread your needle. 

At this point, you go back to taking three or four stitches from side to side and then working your thread through.  Since there was an enormous, piled-up bunch of thread, I’m pretty sure I did three or four stitches, worked just a couple of yards of thread through, then took three or four more stitches.  The huge pile of thread tangled up twice and I very carefully picked out the knots both times – with this much effort invested, I was determined it would be a single length of thread!

Tedious. 

Have I said tedious?

I probably should have started out by saying the pins holding Jane to the mounting board remain in place while lacing.  I kept a towel folded over the pins as much as possible so as not to snag the thread.


After reaching the other end and finally cutting that thread, it’s a good idea to turn your needlework over to make sure it looks the way you want it to.  If it’s not perfect, you can still make small adjustments at this point by removing pins and scooching the ground fabric one way or the other, then repining.  When it’s just right, it’s time to tighten up the lacing, once again starting in the center and working to each end.  When the entire side was snug, I anchored the thread.

I followed the same process to do the lacing top to bottom.  Various online references I found said mitering the corners is not necessary, but I’ve always done that, so Jane’s corners are mitered and stitched down.


This was undoubtedly way more detail than anyone was looking for…  If you’ve made it to the end, thanks for staying with me!


>^..^<

Tuesday, February 19, 2019

Jane Turner, afterword


As you can see, Jane Turner is now proudly hanging on the wall.  She’s in the living room, just beside the room’s entrance.  Not where I had envisioned her, but Wonderful Husband pointed out that in my chosen location, rather than catching my eye each time I walked by, she would be shadowed and invisible for a good portion of the year.  Sigh.

I did mount her myself, probably more from paranoia than any other reason – I couldn’t even think about handing her over to anyone else without getting queasy!  Here’s the frame I picked.


I used to use unflavored dental floss to mount needlework, but thought I’d see what was recommended and after some internet research, decided on using perle cotton.  After getting my work space prepared, I did the requisite blocking and measuring.


And pinning to the foam core…


… and repinning after turning things front side up.


Of course Harley wanted to help.


Giving in to my overachiever side, I decided that the "recommended" single looooooooooong strand of perle cotton lacing left-to-right and another single stand top-to-bottom was the best way to handle mounting Jane.


Have I mentioned that Jane's 24 inches tall?


I don’t know how a professional laces needlework onto a backing board, but I figured that over time, in-out-in-out would be a lot better for Jane than a single stitch passing through the linen, since this would put much less stress on specific spots in the fabric.


Starting in the middle allowed me to estimate the length needed for the other half - I tried to keep count of how many "pulls" I took.  And it worked ... pretty much, anyway.  I’m pleased with how little of the perle cotton was wasted.  It took nearly an entire ball to do the job.  The full ball below is for comparison so you can see how much was used, and the loose snippets are the bits that were cut off.


Of course the corners are miter-folded.


After a couple of hours (oh, my tired back!), she’s ready for the frame!


Wonderful Husband helped by drilling tiny holes for the small screws used to mount the hanging wire.


Do you get the Scarlet Letter’s newsletter?  If not, this may seem a bit odd.  When the Grace Kemish sampler was from her frame, Marsha discovered that dozens of bay leaves were inside the backing/dust cover.  The stitcher must have known they are a natural bug repellent.  Cool, huh?  Adding some seemed like the right thing to do (hey, it worked for Grace for 200 years!), and we have a *big* container of bay leaves, so I figured, why not?


I filled out and used the little tag supplied by The Essamplaire, and added a brief note of my own, then glued the dust cover to the back of the frame and weighted it.


I may not be making quilts any more, but I know how to put my book and magazine collection to good use!


And here she is in all her framed glory!


Would you believe after all the care taken in getting the stitching mounted properly on the foam core, all the pinning and repinning and checkingcheckingchecking, I didn’t turn the frame over before putting on the backing paper??  Argh.  Yes, I think she is the tiniest bit crooked in the frame.  I will remedy this at some point, but don’t have the heart to do so right now.


>^..^<

Thursday, January 25, 2018

Tangentially related...

... to stitching, that is.

Shortly after I began working on Jane Turner, I realized that Amy Mitten’s fat little book on everything you ever might want to know about executing the Montenegrin stitch (HERE in case you’re curious about the book) was going to be a necessity as I had never stitched it as anything but a dividing line straight across a sampler.  If you follow that link, you’ll see that Amy Mitten designed a humorous pocket to store and carry the book – fun, yes?  I thought so too, but figured I didn’t need it, so couldn’t justify it (and didn’t want to have to complete that project in order to work on Jane Turner).

Now that I’m getting really close to the bands that are filled with Montenegrin, I was thinking more and more about that pocket and how something similar would keep my book in better shape than just dropping it into my stitching bag every night.

So I dug out some supplies…


… and measured and marked and made a pattern.


Then I rooted through my denim stash till I found a piece that was tough but still soft.

And then I got too tricky for my own good – something I absolutely excel at when finishing smalls or making things like this.  Wouldn’t it be much nicer if the pocket was lined?  Yes, of course!  Cut two pieces of denim …


Uh oh.  How am I going to construct it?  Well, just sew the two pieces together, turn, and then … oh wait, can’t do the pocket side seams easily that way....  Okay, sew the pocket sides together for each piece and square off the bottom corners, turn one inside out and stuff it inside the other and then … oops, that’s a LOT of hand stitching to finish it.  Seems there should be a way that I could sew the two pieces mostly together and then turn it all through an open part (I’m still pretty sure this *can* be done… but work seems to be using the entire allotment of brain power these days and I just couldn't see how it ought to be done).

But at this point I was, as we say in our house, a bear of very little brain (apologies to A. A. Milne).  Think, think, think…

All right, let’s go for the least amount of hand sewing:  sew, turn, press, fold, pin …


Sew down the sides by hand.  Ah, at least I can shape the bottom.


Now slide the book in …


… and, finished!


>^..^<

Sunday, September 3, 2017

Working at finishing

I've had this piece stitched for ... I honestly don't know how long as I didn't photograph it once the stitching was complete, but I'm guessing it was from somewhere between 2002 and 2006 since I'm pretty sure it was stitched as part of a Christmas ornament SAL with the now-defunct Yahoo Group Chartswappers.  Of course sharing with you has made me curious, so I'll have to dig back through the JCS ornament issues to find out what year!

For some reason, my heart got set on making this an oval ornament.  Maybe because of the arc made by the juggled stars?  Anyway, had cut posterboard ovals ages ago and put them with the stitched piece but was leery of starting for fear of smooshing everything when gathering the fabric around the form - this is a rather stiff unbleached linen.

Then yesterday I remembered the scraps of foamcore left over from framing Noah.  Yes, the how-to-do-it has been right there all along, waiting for me to figure it out.

Maybe I can finish it today - will certainly be inside all day as it is pouring!  Now if I can just find my box of trims....


How's your holiday weekend - what are you doing for fun?


>^..^<