Showing posts with label counted thread needlework. Show all posts

Wednesday, April 10, 2019

At long last....


Rachel at Ten Hour Stitcher (LINK) is our host for this compltely brilliant SAL.  Thanks again, Rachel, for the much needed kick in the pants! 

This one requires a little history.  In 1995, I was able to attend the Spirit of Cross Stitch Festival in Valley Forge.  It was the second time I’d gone to SOCS and this time I not only knew what my class projects looked like *before* class started, I was prepared for the awesome merchandise mall.  By that I mean I was ready to look for charts and supplies for classes from a previous year that I’d fallen in love with.  One of the charts I picked up was Merry Cox’s Sampler Sewing Case.  After a minor debate with myself, I also bought the SOCS video class with Merry since the project was a similarly designed sewing case.

Understand that the intent behind purchasing the video was to get detailed finishing instruction for the other chart – I had no intention of stitching the case in the video.

Are you laughing yet?

Of course at some point after finishing the first sewing case, I ended up contacting Merry in order to acquire her materials kit for the case in the video.  The original sampler case was stitched in 1997 and fully finished shortly thereafter.


While working on the second sampler case, I decided I wanted it to be different from the first one – my chart has so many notes and ideas in the margins!  The plan was to turn Merry’s normal mattress pincushion into a pocket.  And oh, while I’m at it, let’s make the needlebook a bit snazzier too.

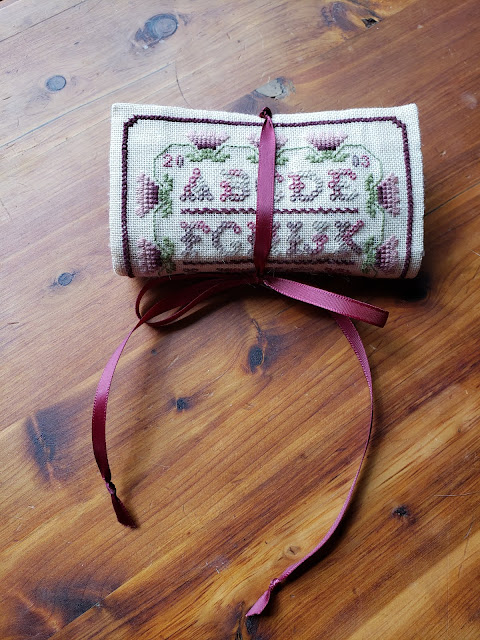
Stitching for this small was finished in (*cough*) 2003.  Ever since, it’s been rolled up and tucked carefully into my (Merry Cox SOCS class) Shaker Box with a number of my completed smalls, patiently waiting for me to go through my making-quilts frenzy and come back to stitching.

 
(This is Merry’s case – screenshots from video class)

A few years ago I got a bug to finish the sewing case.  For some reason, I’d thought it was larger than the first case.  Nope.  As charted, it's not even as big as the first one.  So there was pondering as to how to enlarge it without losing the original feel of the project (and also without broad expanses of blank linen).  I trawled eBay to acquire more of one of the project threads, DMC flower thread (long gone from LNS inventories), then planned and stitched a border.

And then I got cold feet.

Really, what had I been thinking?  A tool-holding pouch with a flap closure in this itty-bitty case?  Back into the Shaker box it went so it could … age a bit more.

Enter Rachel’s SAL (*whoops and cheers and applause*), which got me seriously thinking about this project again.  Preparing to work on the project required some serious advance planning steps, beginning with figuring a way to transfer the video file to my laptop which does not have an integral DVD drive.  Hey, at least it was *on* a DVD rather than a now-useless VHS tape thanks to Wonderful Husband.

For the past few weekends I’ve disappeared into the back bedroom (where sewing machine, ironing board, and other essentials reside) for an hour or so a day.  Yes, in addition to being a slow stitcher, I’m a slow finisher as well.

Now when one is off the instructions map, one needs mock ups and templates to ensure plans and ideas work.  Especially when one’s design is way too fancypants for one’s own good.


That tiny bit of paper with staples is my pocket model and the other paper is my pattern.  I even basted the pieces to the outer case this time!


I changed the poem just a touch since I saw no reason to break words across two lines.


On the inside bits, I stitched the letters over one so there would be room for more information ... and so I could put designs and words on the undersides of those flaps.  I also added a strap to better secure my scissors - when Merry shows off her Sampler Sewing Case #1 in the video, you can see she made a scissor strap for that one, though I don't think it's called for in either pattern.


Rather than nun’s edged linen needlepages, I used felted wool to better protect my needles and pins from rust - our climate is more humid than I'd like.


Here's that pesky double pocket that took so long to go from wisp of idea to reality.


Even though I didn’t want to add all the bows that Merry used on her case, I thought the waxer pouch was a good place for the little bow charm.  The drawstring on the other pouch is made from some of the silk ribbon provided to make those triple bows (see pics of Merry's case) – they were a bit too frou-frou for me.


Happy dancing!  Certainly it took me long enough to finish this piece, but I'm generally pleased with the result.

Thanks for visiting with me today, and for allowing me to ramble.


>^..^<


Thursday, February 22, 2018

Heeeeerrre’s Monty!


No, I won’t be talking about what’s behind door number three today or offering you a quick $50 to give up the contents of that box you just selected.  Instead I'd like to introduce you to the Montenegrin stitch.

Like any number of (fancy) stitches used on 17th century samplers, the Montenegrin stitch is reversible.  Before working on Jane, my experience with this stitch had been a single horizontal row used as a dividing band.  And I’m not even sure I was executing the stitch correctly (need to look at a one of my other stitch books to check on that).  Hands Across the Sea Samplers has a nice tutorial for the basic stitch HERE.

I’ve told you before about Amy Mitten’s wonderful little book and how I would be lost without it.  Jane was clearly quite adept at Montenegrin stitch and not only stitched rows that go diagonally down, across, diagonally up, and so forth, she also stitched flowers and such using it. 

So back to that reversible thing.  That indispensable little book details two different ways to make the stitch, and each way makes a different pattern the back.  So let’s start with a peek at that since I decided to do the two lines which mark the top and bottom of Band 13 first, and that I’d stitch them in the two different ways.

So even though I told you you’d seen the last of Jane’s backside months ago, I’ll flip her over for you here.


In the top (blue) row, the steps of the Montenegrin are stitched in such an order as to make a four-sided/box stitch on the back.  Cool, huh?

The other way to do the stitch is a little easier for me, guess it just feels a little more natural.  The back of this version (red row) produces a pattern that is cross stitches with vertical lines between each stitch:  X|X|X|X|X|   But because I’m using two threads on 35-count linen, it’s rather hard to see that pattern.

From the front, the two methods produce a similar stitch, though I think the sequence that makes the four-sided stitch on the back give a slightly more braided look on the front of the piece.


Thanks for stopping by!


>^..^<

Sunday, December 31, 2017

Happy dance, and other stories

Jane Turner band 11, aka the Lady Band, is complete - woohoo!!  We’ve been expending most of our energy doing various snow moving things, but I was able to stitch a bit last night, completing the filling-in of Lady Jane’s face and neck and giving her eyes and a mouth.  The mouth is my addition - can you believe Jane didn’t give her lady a mouth?  Strange!

And then I spent some time checking the chart and instructions just to make sure I hadn’t missed anything (I hadn’t - yay).  Wanna see?


Now, back in early January when everyone was making their stitching plans for the year, I had hoped to have Jane finished in 2017.  Ha!  Still, it feels like the end is in sight now.  All that's remaining to stitch are three narrow bands, one wide band, and then the alphabet and Jane’s signature line, so I think an actual finish in the new year should be possible.  Here’s how she looks at this point.


So what are those other stories, and what else is going on?  Well, after the Great Christmas Snow, on Friday and Saturday we got more – we figure about 12 to 14 inches of new stuff fell overnight and through the day yesterday.  So we’ve been shoveling.

Oh, not the driveway – around here if one doesn’t have a snowblower, it’s wise to have an arrangement with a plow guy.  We’ve been shoveling the roof!


And today I was able to start knocking the snow off our arborvitae in the back yard, which turned out to be one of those easier-said-than-done things.  Just like everything else right now, there is a huge amount of snow on those trees.


Here’s a view of my snow knocker (an eight foot piece of 2 x 2) and a better look at what I was using it on.


Odd selfie.  My feet are down there somewhere!  Not sure you can tell very well from the picture, but that snow is up to the middle of my thighs (and my legs are not short).


I got all the way down the side to the corner.  Hope to do across the back tomorrow.


Today’s newspaper reported that this is already the ninth snowiest winter in Erie since they started keeping records.  Oh, our forecast for the next 36 hours?  Tonight, 1 to 3 inches; tomorrow, 3 to 5 inches; tomorrow night, 2 to 4 inches.

Stay warm and safe.  Happy new year!


>^..^<

Tuesday, December 19, 2017

TUSAL December 2017

CLICK HERE to go to Sharon’s It’s Daffycat blog to read a thorough explanation of the Totally  Useless SAL.   

Phooey.  I *really* wanted to have Jane Turner’s Lady Band finished to show you for this last TUSAL post of the year, but I needed another half hour or so of stitching time.  Guess the good thing is that I got any stitching done at all - last year’s December TUSAL post had nothing to show but crumbs.  

The Silly Stitching Calendar says I’ve had 14 stitching days since the last TUSAL post – not bad considering this is December!  All the orts are from Jane Turner. 


I'm going to wait to show you this band when it’s complete – probably not till after Christmas since my daughter is already here, my son and daughter's husband are both coming in a couple of days and there’s still a lot to do for the holiday.  Oh, who am I kidding – we have such a good time when she’s here that I don’t take time to stitch!

I’m working on Lady Jane’s face and it’s mostly filled in – just need to do her chin and neck and then give her some features and the band will be done.  Ah, I know what to do – I’ll show you what *is* done!

The birds are done.


The big pink flowers are done.


The fruit is done (and so are the leaves).


The creepy crawlies are done.


Even the pesky blue flowers are done.


Thanks for stopping by!


>^..^<

Sunday, November 12, 2017

One thread? Two? … None?

I diligently stitched two detached buttonhole filling samples on my doodle cloth – one using a single foundation thread for each row and the other using two.

Then Francesca made this comment on my previous post, which I’ve truncated a bit (thanks again, Francesca - your comment was not only fascinating, but also a huge help!):

I've studied and done a lot of detached buttonhole in historical reproduction embroidery and have never heard about two foundation threads. About the direction of the stitching, in some old embroideries the foundation thread can be a separate thread that goes from left to right and back right to left and the "working" thread, the one that makes the stitch, can be another thread so the stitching can go L to R and R to L.

I felt sure the words in my instructions said to use two foundation stitches and that the diagram showed that as well, so I pulled out all the instructions.  

Oh dear… what  was that saying about assumptions? 

While the text instructions for this band say to work the detached buttonhole within - and attached to - a chain-stitched border (as Mary Corbet’s video tutorial shows and as Tricia Nguyen’s directions show as well), there is nothing at all there about any kind of foundation thread. 

Okay, that’s fine – the directions are for stitching the sampler, not instructing me in the techniques for the various stitches used.  However, the stitch diagrams included are quite generic (of course it makes perfect sense for a designer to be able to reuse stitch diagrams).  But the one for detached buttonhole is apparently for executing the stitch without using any framing, whether chain stitch or back stitch or any other stitch.  So yes, it really DOES say to use two foundation threads, but that’s only for the *first* row – subsequent rows are merely worked through the first row, and call for no foundation thread at all.

Yeah, I’m a turkey.

So let’s take a look at my stitched samples anyway, since I really did learn something from this exercise … uh, something more than reading twice before starting to stitch.


The upper sample uses ONE foundation thread on each row, and the direction of the detached buttonhole stitches is always left to right.  The lower sample has those erroneous TWO foundation threads, and stitching direction alternates – left to right on the first row, then R to L, and so on.

I like the nice even look of the upper sample – see how the rows tend to slant back and forth a bit in the lower one?  And while I like the stability and sturdiness that the two foundation threads gave, I think the lacier look is nicer for Lady Jane’s dress, and I'll be using the single foundation thread when I next pick up the sampler and start filling in a sleeve.

Another thing I learned is that – for me at least – it’s easy to pull the stitches too tight.  While the stitches look nice and even for most of the top sample, you can see the bottom row looks rather wonky.  That’s because it’s really working to pull the detached part down against the chain stitch outline and each individual stitch is taller than it ought to be as well as tighter.  The high contrast of the blue border doesn't help that sample.  The lower box is stitched in the color that actually outlines the dress.

In the lower sample, I added an extra row even though it looked like there was no room for it on the sides, and that allowed the rows to be more consistent in height and tension.


>^..^<

Thursday, November 9, 2017

To two or not to two...

I'm at the point on Jane's Lady Band that I need to decide how to do something and I'm in a dither.  Working on Lady Jane herself, (nearly) everything is finished except the parts of the dress that are to be filled with detached buttonhole stitch.

Here's Lady Jane in her partially finished dress.  The bits that are filled are done with perle cotton couched with every-day DMC.  I think it looks rather cool.


Have never done detached buttonhole before, but it doesn't seem like it should be hard.  I've certainly done enough normal buttonhole stitch on crewel projects.

Except.

Except that the stitch instructions provided with Jane Turner say that TWO foundation threads should be laid for each row, and the stitching is to be done left-to-right in the first row, then right-to-left in the second, then left-to-right and so forth.

And...

Each and every tutorial I've found online calls for ONE foundation thread for each row, and each row to be worked in the same direction (I think they all call for stitching left-to-right).

I will be using my doodle cloth to ... um ... audition both versions - though I do sort of resent the time it will take to lay TWO chain stitch rectangles and work blocks of the stitch in both methods since it won't be actual progress on the real sampler.

What would you do?  

Execute the stitch as instructed in the directions?  Or using the (likely more consistent looking) method found in online tutorials from Tricia Nguyen, Mary Corbet and others?   My Jane is an adaptation rather than a reproduction at this point as there have been any number of changes (both intentional and unintended), so authenticity is hardly the issue.  

I welcome your thoughts!


>^..^<


Saturday, August 12, 2017

Progress...

The double running stitch on Jane Turner’s Lady Band is finished, and I feel a bit like Dr Frankenstein shouting it’s alive!!!  The lady has a head!  The problem is, that’s all she has.  Her body / dress is outlined in chain stitch and I don’t plan to do that until all the (endless) leaves are filled in.

And harrumph, I’ve found another error on the chart.  I really should have learned by now to look at all the pictures before doing major bits of stitching, but apparently I’m untrainable about certain things.  The trees, with all their leaves and fruits and flowers, are charted as a (nearly) perfect mirror image, but Jane didn’t stitch them that way and neither did the model stitcher.  So what did the model stitcher work from if her stitching matches the original sampler rather than the chart?  Oh well, deep breath.  (chanting to self:  adaptation … adaptation … adaptation)

This band has several things in the chart that are not addressed in the written instructions, such as those four light blue blips around the lady (they're actually diamond shaped).  No idea what they’re supposed to be.  And those two odd looking things, the right-side one being right above the caterpillar?  Moths.  Whoever stitched Jane’s “sister” samplers made them clearly moths, while Jane’s look like … odd things.  Since I don’t really care for moths in samplers, mine will just be odd floaty things as well.


ETA:  Apologies for not being clear!  In my sampler, the two sides ARE a mirror image, but on Jane’s original and on the model, the right side is different.  Blissfully unaware of this, I stitched the double running stitch as charted, but the chart doesn’t match the model or the original sampler. 

In the picture below, Jane’s original is on the left, the model in the center and my Jane is on the right.  Look at the areas inside the ridiculously bright green ovals.  In the original and the model, there’s a fruit at the bottom and two good-sized leaves at the top, but on mine, there’s a fruit at the bottom with little leaves attached to it and a second fruit at the top - definitely not the same!
 
(end of added bit)

Haven’t shown the entirety for a while so thought I’d share at this point.  Jane measures 17 1/2 inches from the top row of stitching to the bottom of the Lady Band - getting big!


Hope you all get lots of stitching time this weekend!


>^..^<

Thursday, June 29, 2017

Arrrgh

Yesterday I printed the two pictures of the Lady Band that were in my previous post *LINK*, from the stitched reproduction model and from Jane’s very own sampler. Printed 'em nice and big so I could refer to them while stitching (hey, the supplied picture doesn’t offer a lot of detail).

Uh oh.

TWO uh ohs.

The first one is annoying, but truly not terrible. Here’s a small bit of both the reproduction model and the original sampler, showing part of the band I finished last week. Picture’s fuzzy because I’ve blown it up so much, but it's easy enough to see the problem. Look at the green arrow on the snippet of my Jane below it. See that bit that I didn’t fill in, but *is* filled on the model and the original?

Guess what’s NOT in the (densely typed, poorly punctuated, very stream-of-consciousness, single paragraph for each band) instructions. Grumble. So ... that band was complete. And now it’s not.

And that really bugs me and makes me feel like I cheated in starting the next band (yeah, pretty dumb, right?).


The other issue makes me feel a bit ill. Look at my leaf the red arrow points to – see how the satin stitches are diagonal to the weave of the ground fabric? The instructions have nothing to say about what direction those stitches should go in, but before filling the first leaves way back in band 2, I looked and looked and looked at the supplied picture to try to figure it out. And it looked to me like those satin stitches went diagonally.

There are several leaves in the Lady Band that have narrower segments than ones I’ve already stitched – they're so skinny that I couldn't figure out how diagonal satin stitches would fit. So when I printed the pictures, I zoomed in really close to see how they were stitched.

Arrrgh.

Apparently ALL the leaves on the original - and the model - are filled with satin stitches that run vertically and horizontally, meeting at the center line of each leaf. You can see that in this picture from the model. It's harder to see on the original sampler, but those leaves the same.


I’m not tearing out the dozens of leaves I’ve stitched. Thought about it for maybe three seconds. Nope, not doing it. So now I’m back to trying to figure out how to stitch the leaves with the really narrow sections. Maybe the best thing is to change those four leaves a little bit so I could fill them in a way that matches the rest of my leaves?

Rats.


>^..^<

Saturday, June 24, 2017

TUSAL June 2017

Sharon’s It’s Daffycat blog will give you a thorough explanation of the Totally Useless Stitch A Long. CLICK HERE for all the details.

No posts in an entire (lunar) month? Rats. And the Silly Stitching Calendar says there have been only 11 stitching days since the last TUSAL check in.

I keep writing and backspacing here, undoing what I’ve typed because it sounds like Jay Stewart describing what’s behind Door Number One (sigh). Two piles of orts this month as there were several of days I just was not up to stitching on Jane.


Band 10 of Jane Turner is finished. It’s a little different with the couched centers of those flowers, a technique that does not appear elsewhere on the sampler. And I can’t help wondering why Jane didn’t fill in those other leaves….


The next band is the one with the trees and the lady and I’m excited to start on it – my needle’s at the first stitch and all ready to go! To whet your appetite a bit, here’s a view that band in the Essamplaire’s reproduction (with apologies to Stitching With Kittens for snagging from her blog as I couldn’t find a similar shot elsewhere), and then again from what I believe is Jane’s own sampler. Pretty, no?


The other orts came from work on the border vine on Catherine Theron’s 1840 Town House Sampler, which has now rambled down both sides and is ready to go across the bottom … and it lines up – always a relief. Am debating whether to stitch the berries (? rosebuds?) in Smyrna cross or perhaps Algerian eye with one thread – just so it’s a bit more interesting. Where it was last time I showed you, and where it is now:


>^..^<

Saturday, May 27, 2017

TUSAL May 2017

Check Sharon’s It’s Daffycat blog for a thorough explanation of the Totally Useless Stitch A Long. CLICK HERE for all the details.

Rather a modest pile of orts this month:


The Silly Stitching Calendar says I stitched a mere dozen days since the last TUSAL check in. Phooey.

All orts this month are from Jane Turner. Band 9 is complete (and those blue flowers were just as much of a pain in the neck in band 9 as they were in band 7), and all the outlining is complete for band 10. Need to fill in leaves and petals and grape-like flowers with satin stitch, and then fill the large flower centers using couching. Have only done couching in a straight line prior to this, so spiraling to fill the circle may be a bit challenging.

Here’s a peek at bands 9 and 10.


I'm getting excited about the next big band coming up as it's the lady band!


>^..^<

Thursday, April 27, 2017

TUSAL April 2017

Check Sharon’s It’s Daffycat blog for an explanation of the Totally Useless Stitch A Long. CLICK HERE for all the details.

Lots of orts! *TWO* piles of orts this month!


And the Silly Stitching Calendar says I’ve actually stitched (as opposed to just *thinking* about stitching) 17 days since the last TUSAL check in.

Because I completed Jane Turner’s band 8, I allowed myself a new start on something simple. Out of my Other Stitching Bag (which has at least a dozen projects kitted up), I chose to begin Catherine Theron’s 1840 Town House Sampler – a kit I bought from the Gentle Arts/Theron Traditions booth at the 1992 Spirit of Cross Stitch Festival in Saratoga Springs, New York. Why yes, I believe in letting my stitching projects age, sort of like a fine wine (ha!). Anyway, here’s what it looks like. Picture's a bit fuzzy, but you get the general idea, right?


And here’s my start:


Wow – after months of working on 35 count, the 28 count linen for this piece seems huge! It almost feels like I don’t need the cheaters to see it (but yeah, I really do). Interesting tidbit in case you've never taken a class with her: Catherine Theron likes to use big needles. That’s probably an oversimplification, but I remember she really stressed using the appropriate size needle for your fabric, not just automatically reaching for a 26 no matter what the project is. So packaged with that kit was a size 24 needle. I will admit it “fits” the fabric nicely, but at first it felt like I was waving a baseball bat around!

I posted the other day about finishing Jane Turner Band 8 – still doing happy little bounces about that. Here’s Jane in her current entirety – all the outlining on Band 9 is complete and I’m working on the satin stitch filling.


>^..^<